C2ST Science at Home: Winter Wonder Experiments
By C2ST Staff
The cold weather and short days that come with winter can be gloomy, so let’s brighten them up with some science! These easy experiments are designed to help us learn about science from the comfort of our homes… with a few quick, bundled trips outside. The cold air can help us learn about chemistry and physics by changing the way that atoms and molecules–the tiny things that make up everything around us–interact with each other. We included a few experiments here for you and encourage you to try them all, but they can all be done separately. The materials should be easy to come by, or ones that you already own, but we included links just in case!

Experiment One – Freezing Bubbles
MATERIALS:
- Bubble solution OR warm water, dish soap, sugar, cornstarch (optional), baking powder (optional)
- Bubble wand OR any of these DIY materials: https://bit.ly/3lctmJi
- Temperatures below freezing: 32 Fahrenheit or 0 Celsius
- Camera (optional)
INSTRUCTIONS:
Homemade Bubble Solution
- In a bowl, whisk together 2 cups of warm water and ¼ cup of sugar until the sugar dissolves.
- Add ¼ cup of dish soap and whisk until combined.
- Optional: Add ¼ cup of cornstarch and/or ½ tablespoon of baking powder to make the bubbles work a bit better.
- Optional: Let the solution sit for at least 30 minutes before blowing bubbles.
The Experiment
- Before going outside, talk about what you think is going to happen:
- Will the bubble freeze? If so, where will it freeze first?
- Do frozen bubbles pop, or freeze into solid little spheres?
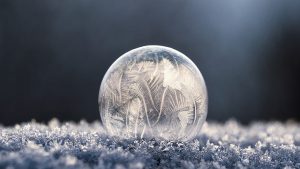
- Gather your bubble-blowing supplies, bundle up and head outside! Frozen bubbles can be quite pretty, so you may want to take some pictures of videos.
- Go outside, blow some bubbles and really watch them freeze! Look closely to see the ice crystals form.
- Do they form in a pattern, or is it random?
- Do the crystals move around as they are forming?
- If you took any photos or videos, please share them with us @C2ST using #ScienceAtHome!
THE SCIENCE:
If you watch closely, you should see small ice crystals form and then float around and grow as the bubbles freeze. This happens because the bubbles don’t freeze evenly–certain spots on the bubble will be exposed to slightly different temperatures causing them to freeze earlier or later. As small spots freeze, they will be swept up by the small current forming in the liquid surface of the bubble until the rest of the bubble freezes. Some physics and chemistry!
Experiment Two – Snow vs. Water
MATERIALS:
- A clear jar or glass OR clear liquid measuring cup for collecting snow
- Towel
- Dry-erase marker OR tape and a permanent marker for labeling
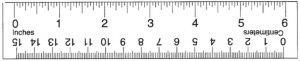
- Ruler or something to measure with (feel free to cut out the one below!)
- Writing utensil
- Paper
- Snow!

INSTRUCTIONS:
The Experiment
- Gather your jar or liquid measuring cup, and your labeling materials (if you are using a liquid measuring cup, the labels are included!), bundle up and head outside!
- Fill your snow collector, and pack it in a bit so that it fills the collector.
- If you are going to label your jar, do it outside so that there is no condensation. Mark the jar with a line and the word “Snow” at the top of the snow. Next, make a guess as to how much water will be in the jar when the snow melts with a line and a “P” for prediction.
- This is only a prediction, so it’s ok to be wrong! Does snow feel as ‘heavy’ as water?
- Once back inside, place your snow collection on a towel so that any condensation doesn’t make a mess.
- On your piece of paper, take some notes and make some predictions:
- Write down the current time.
- Write down a prediction for how long it will take the snow to melt completely.
- If you wish, measure the height of the snow and the height of your prediction for the amount of water the snow will become.
- Why did you predict the melted snow would turn into the amount of water that you guessed?
- Relax and watch the snow melt (you can do other things while the snow melts)! Be sure to check in regularly so you can keep track of the time it’s taking.
- When all the snow has turned into water, dry any condensation off the jar and add a mark at the top of the water line that says, “Water.”
- If you’ve been measuring, add that data and the time taken to melt to your piece of paper.
- How close were your predictions to what you measured?
- If you took any photos or videos, please share them with us @C2ST using #ScienceAtHome!
THE SCIENCE:
Water is really unique and some of what makes it so unique helps explain the way that life on earth works. Water, or H2O, is named because it is made up of two hydrogens and one oxygen. Easy, right? Well, when those atoms hydrogens and oxygens combine, they do so in this shape every single time. When water freezes, that shape causes it to form ice crystals in really unique ways, and the crystals are very light! Snow and ice are less dense than water. That means if you have one glass of water and one glass of snow or ice, the glass of water will be heavier. Since ice is less dense than water, things like icebergs float and that supports life in the poles. Animals like seals, polar bears, walruses, and even tiny shrimp called krill all depend on ice to survive! This also helps explain why a whole glass of snow turns into only a small amount of water.
Experiment Three – Indoor Hockey Slide
MATERIALS:
- Large baking sheet
- Water and something that allows you to gently pour it
- Paper and writing utensil
- Random assortment of small objects to slide
- Towel (optional)
![]()
-
- INSTRUCTIONS:
- Start by checking the weather. If the temperature is cold enough, you can freeze your ‘hockey table’ outside. Otherwise, you can put the baking sheet in the freezer.
- Find a nice flat spot, either outside or in the freezer, and place the baking sheet there.
- Fill up the water, and then gently, slowly pour it onto the baking sheet until it forms a shallow layer across the whole sheet.
- While waiting for the ‘hockey table’ to freeze, gather your ‘pucks’ to slide across the table, and create your data sheet.
- Gather random materials from around the house, or outside, that you can test as ‘pucks.’
- Try to gather materials that are different shapes, textures and weights. Examples include: marbles, bottle caps, felt, rocks, twigs, grapes. Be creative, and have fun!
- Create your data sheet, and make some predictions!
- It is easiest if you grab two sheets of paper, but you can also divide one sheet in half, or use the front and back.
- Label one part of the data sheet, “Predictions” and the other, “Observations.”
- On both parts of your data sheet, create three columns and label them from right to left with the titles, “Item,” “Slides,” and “Doesn’t Slide.”
- Under the items column, create rows for each ‘puck’ that you’re going to test.
- Now that you’re done making your data sheet, make some predictions on the “Predictions” side of your data sheet! For each ‘puck’ you’re going to test, predict whether it will or will not slide. Talk about why you think that. What does a hockey puck look like? What items look like they will slide well?
- Once your ‘hockey table’ is frozen, bring it in or get it out and place it on a towel (optional). The towel will help soak up the condensation that forms on the outside of the baking sheet.
- Begin testing your pucks! Make sure you don’t slide the pucks too hard, and try to be consistent with each one. Record the data on the “Observations” side of your data sheet.
- Once you’ve tested all the pucks, talk about what you’ve learned.
- What puck worked the best? The worst?
- Did the pucks that slide well share any similar qualities? What were they?
- What about the pucks that did not slide well?
- If you took any photos or videos, please share them with us @C2ST using #ScienceAtHome!
- INSTRUCTIONS:
THE SCIENCE:
Anyone who has walked outside during the winter knows how slippery ice is! It can be very scary when your foot starts to slip. It’s no surprise that our indoor hockey table was slippery too, at least for some of the objects. Smooth items like bottle caps or marbles should have slid very well, just like a real hockey puck which is made of smooth rubber. Ice is smooth, and when you have two smooth objects rubbing against each other there is very little friction. Friction is the force that two objects experience when rubbed together, so it makes sense that two smooth surfaces would experience very little. When you have a rough surface, like felt, or a stick, there is going to be more friction and those objects will slide less.